News
New standards for X-ray tube focal spot sizes at the nano- and micrometre scale
EMPIR project develops new NanoXSpot (NxS) gauge with line groups, Siemens star, and hole patterns for focal spot size measurement down to 100 nm
Computed tomography (CT), where a volume dataset of an object is reconstructed from a series of X-ray images taken from different angles around an object, is best known for its use in medicine for patient diagnosis. It is also used in industries such as aerospace and electronics for non-destructive testing and for the evaluation of defects and inner structure as well as to verify product dimension. These industries require inspection resolutions down to nanometre scale.
As the miniaturisation of electronic devices has become increasingly prevalent, and with the advent of new technologies such as electrical vehicles and the use of lightweight compounds in the aviation industry, there has been an increasing need for CT measurements at 5 µm resolution or less – approximately 1/10th the width of a human hair. The spot size of the X-ray tube directly affects the measurement resolution. However, there are no internationally accepted standards or measurement methods for X-ray tube spot sizes below 5 µm. X-ray equipment manufacturers applying proprietary measurement methods leading to inconsistent results. Therefore, new methods based on traceably characterised gauges for the determination of the spot size, shape, and position are being developed and shall be introduced as an internationally recognised standard for these spot measurements.
EMPIR project Measurement of the focal spot size of X-ray tubes with spot sizes down to 100 nm (NanoXSpot, 18NRM07) is developing new standard practices for characterising X-ray focal spots to a higher level of accuracy than achieved currently.
Having started in 2019 the project has already delivered several results including:
- Contributing to the 2020 revision of ASTM E1165-20 and 2021 revision of EN 12543-2:2021 regarding focal spot standards larger than 100 µm – an essential step to meet the planned development of the new standard for smaller spot sizes in this project.
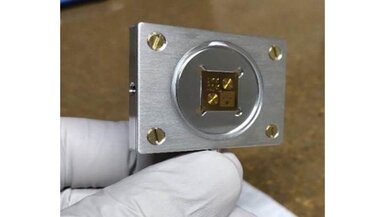
- A new prototype gauge for a standard practice for nanometre focal spot size measurements was developed. The NxS gauge consists of four quadrants with line group patterns, converging line patterns, and hole patterns. After metrological characterisation of the gauge, it will be used in an international round robin test and will become commercially available after the project ends in 2022.
- Simulation capabilities have been developed to address the evaluation of the impact of geometrical deviations in physical gauges. The study used CAD models which included the most common deviations from the expected shape, which may have a high impact on the final evaluation result.
- For the investigation of the different pattern types, the following techniques have been developed and implemented:
- fit procedure to analyse the line group patterns
- reconstruction techniques to reconstruct the focal spot from the hole patterns permitting first time measurement of focal spot sizes and shapes in the range of 200 nm to 100 µm
The implementation will become an open public software after the end of the project.
- A specification of a radiographic setup for every type of measurement was derived, considering the requirements of current and future focal spot standards, to ensure the comparability of results.
The work of this project will strengthen the competitiveness of the European X-ray system manufacturers. It will benefit many of the industries that require analysis of nano- and microstructures with metrological CT systems, including pharma-biotech, semiconductors and the aviation and automotive industries.
This EMPIR project is co-funded by the European Union's Horizon 2020 research and innovation programme and the EMPIR Participating States.
Want to hear more about EURAMET?
Information
- EMPIR,
- Standardisation,
- EMN Advanced Manufacturing,
Strengthening the global competitiveness of Europe’s electrical industry by equipping manufacturers with metrology tools that demonstrate equipment qu... more
Developing a metrologically-based field assessment of glare and obtrusive light more
Standardising industrial procedures for the magnetic properties of devices leading to the improved quality of a wide variety of products more
Implementing quantum-based pressure measurement techniques in European industries more
Developing reference materials for mass spectroscopy to monitor radioactive and stable isotope pollution in the environment more


